Work Orders
Work Orders are orders created to tell an operator what products and quantity need to be filled on or by a certain date. As operators fill against these work orders, the quantity is updated and reduced until zero, when the work order is then closed.
Why Do You Need It?
Work Orders allow for fewer errors and a more efficient process. It removes the paperwork, phone calls, and walkie-talkie messaging normally required and helps your production staff know when there's work to be done.
To use Work Orders, please contact your Support Team at support@trackabout.com to have this feature configured for you.
What Needs to be Set Up
To conduct Filling with Work Orders, work with your TrackAbout Support Specialist to make sure the following features are enabled:
-
Racks and Tanks
-
Container Filling
-
Asset Families
Creating Work Orders
TrackAbout provides two methods for creating Work Orders
-
Create in TrackAbout using the Create Work Order process
-
Sending Work Orders from your external system to TrackAbout
Method 1: Creating Work Orders in TrackAbout
Users can create their own Work Orders for filling from the TrackAbout website by following these steps:
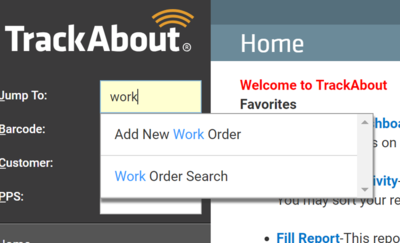
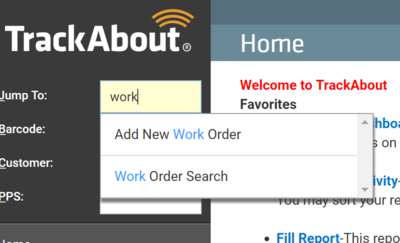
From the Jump To box, go to Add New Work Order
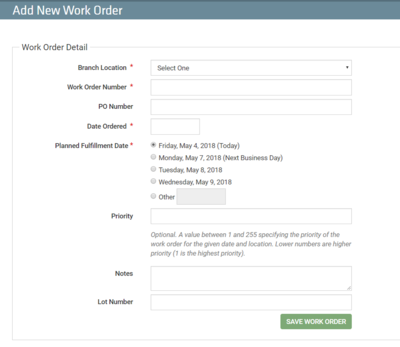
Fill in the required fields, as indicated by the asterisks (*). The Work Order Number can either be typed in manually to match records, or can be automatically generated by TrackAbout.
Priority indicates which work orders should be fulfilled first.
This feature is intended for use on maintenance work orders, which will be available in a future release.
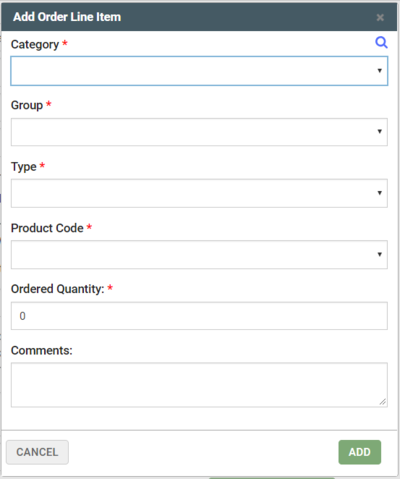
Add Line Items and quantities to complete the work order
Method 2: Integration - Sending Work Orders from an External System
External systems can send work order information to TrackAbout, which will be displayed to the user during the SORT process, and will be available for selection during the FILL process. Work orders are passed from your external system to TrackAbout via a webservice. This webservice endpoint is https://www.trackabout.com/ws/workOrders.asmx
TrackAbout supports the following kind of information for Work Orders:
-
New Order Type for Work Order
-
Priority
-
Parts Lists
-
Product Code
-
Unit of Measure
-
Quantity
-
Routing Steps
-
Step
Here is a sample of the Work Orders webservice xml. This is what TrackAbout would expect to receive from your Ordering System:
<WorkOrders>
<WorkOrder>
<OrderNumber>WO00001</OrderNumber>
<BranchLocation>PITT</BranchLocation>
<PlannedFulfillmentDate>2013-03-30</PlannedFulfillmentDate>
<Priority>12</Priority>
<OrderCommentsToDisplay>These are comments</OrderCommentsToDisplay>
<PurchaseOrderNumber>900099876</PurchaseOrderNumber>
<OrderedBy>NEW SMYRNA BEACH</OrderedBy>
<EnteredBy>Vonheeder, Robin L</EnteredBy>
<OrderedDate>2013-03-21</OrderedDate>
<WorkOrderItems>
<WorkOrderItem>
<LineNumber>1</LineNumber>
<ProductCode>OXINDLF</ProductCode>
<ProductCodeDescription>OXYGEN MEDICAL 15 SCF/CYL</ProductCodeDescription>
<ProductCodeUnitOfMeasure>CYL</ProductCodeUnitOfMeasure>
<ProductCodeLotNumberRequired>true</ProductCodeLotNumberRequired>
<OwnerFlag>PX</OwnerFlag>
<OrderQuantity>1</OrderQuantity>
<ProductCodeUNHazardIdentifier>2.2</ProductCodeUNHazardIdentifier>
<ProductCodeUNNumber>UN1072</ProductCodeUNNumber>
<Components>
<Component>
<SeqNum>1</SeqNum>
<Description>Carbon Dioxide</Description>
<ComponentCode>C02</ComponentCode>
</Component>
</Components>
</WorkOrderItem>
</WorkOrderItems>
<RoutingSteps>
<RoutingStep>
<Sequence>1</Sequence>
<Description>Inspection</Description>
<Status>Completed</Status>
</RoutingStep>
<RoutingStep>
<Sequence>2</Sequence>
<Description>Filling</Description>
<Status>Open</Status>
</RoutingStep>
</RoutingSteps>
</WorkOrder>
</WorkOrders>
The addition of Work Order information should not affect the existing orders table as it will still be used for Delivery Orders.
NOTE
Work orders themselves cannot be edited from the TrackAbout website.
Once a Work Order is received in TrackAbout, a confirmation will be returned to the ordering system. Here's a sample of what that response message will look like:
Success_WorkOrderResponse:
<?xml version="1.0" encoding="utf-8" ?>
<WorkOrderResponses>
<WorkOrderResponse>
<OrderNumber>WOTest1</OrderNumber>
<WorkOrderType>WOType1</WorkOrderType>
<WorkOrderStatus>Success</WorkOrderStatus>
<ErrorMessages />
</WorkOrderResponse>
</WorkOrderResponses>
Failure_WorkOrderResponse:
<?xml version="1.0" encoding="utf-8" ?>
<WorkOrderResponses>
<WorkOrderResponse>
<OrderNumber>WOTest1</OrderNumber>
<WorkOrderType>WOType1</WorkOrderType>
<WorkOrderStatus>Failure</WorkOrderStatus>
<ErrorMessages>
<ErrorMessage>
<FriendlyError>Work Order Line number 1 contains unknown Product Code: :MXOIND97'</FriendlyError>
</ErrorMessage>
</ErrorMessages>
</WorkOrderResponse>
</WorkOrderResponses>
Managing Work Orders
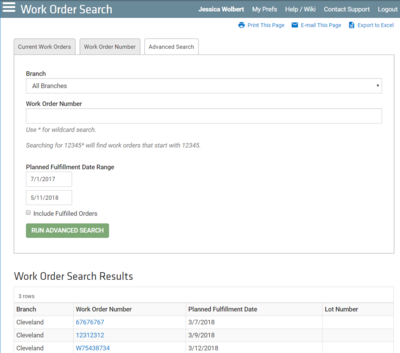
In order to search for work orders, use the Jump To box to go to Work Order Search.
This page behaves similarly to the Order Search page, and will allow you to search for:
-
Current Work Orders
-
By Work Order Number
-
By additional information using the Advanced Search option
In a future release, TrackAbout will also provide the ability to create maintenance work orders for specific assets.
This work order enhancement is available to TrackAbout clients currently using Work Orders. If you’d like more information about this process, please contact TrackAbout Support.
Completing Work Orders
Sort Action
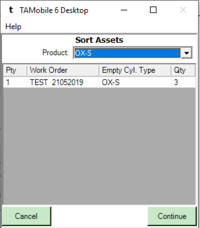
During the sort actions (Sort Container and Sort Assets), the user can see the current Work Orders for their location listed by priority. The operator will not be selecting and assigning containers/cylinders to work orders at this point, but will be able to see what should be prioritized.
TrackAbout can accept updates from client's accounting system as work orders are fulfilled and added, so the prioritization screen is accurate.
During sort, the user can click a button to see a list of work orders. These are filterable by Product Code, and display the following information:
-
Priority
-
Work Order
-
Empty Cylinder Type (Product Code)
-
Quantity
The user can also see this screen during sort container after they scan a pallet and select Filling as its use. When the screen is shown, the data is pulled dynamically from the web server, so we are always showing fresh data.
The user can select the Work Orders to work based on the product code. The grid is empty by default and once the product code is selected from the dropdown, the corresponding work orders are displayed.
NOTE
The Prioritization screen and Priority button are not displayed for a Location that do not have any Work Orders assigned to it. In this same scenario, the 'Sort Container-Filling' action also doesn’t display a 'Priority' button in the asset scan screen.
Parts List
On the Priority screen, once a product is selected, the available work orders will display. The display sequence of work orders will be by priority and then by start date. The operator will be able to tap on a work order and see the associated parts list.
The following information will be displayed:
-
Product Code
-
Product Code Description
-
Unit of Measure
-
Quantity
Handheld steps:
-
Select the 'Sort Container' action
-
Scan a container
-
Select 'Filling' button
-
Verify that user is taken to 'Prioritization' screen
-
Verify that there are some work orders displayed
-
Select a work order from the list
-
User is taken to the 'Work Order Parts List' screen which displays various work order details
From the parts list screen, they can jump to the routing steps screen to review the routing steps.
NOTE
The parts list and routing screens are display only, no entry or update of information is allowed. Alert in TrackAbout Mobile 6 - When a user selects a work order that has been fulfilled or deleted, an alert will trigger and display to the user.
Routing Steps
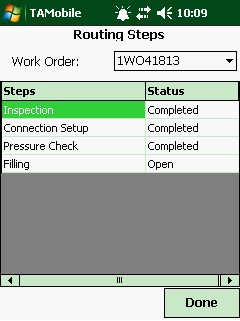
There is a 'Routing Steps' button present on the Work Order Parts List screen. The screen should display the steps for the work order, indicating which is complete and which is not. This button will only appear when there are actual Routing Steps associated with the Work Order.
The user will see information such as:
-
Sorting Completed
-
Filling Open
Click Done. The user will be taken back to the 'Work Order Parts List' screen. Click on 'Done' again on 'Work order Parts List' screen to be taken to the Prioritization screen.
Finish Sorting
Click 'Continue' in the 'Prioritization' screen to display the 'Scan assets' screen. There is a 'Priority' button displayed in scan assets screen.
Logging Time for Sorting
TrackAbout provides support to track the start and end times that a user is spending in the Sort for Filling action. Since Sort Assets is a single user action, the record start date and save date, combined with asset scan times will be enough for our reporting needs. However, since the Sort Container action can be paused any number of times and multiple users can sort at the same time, the record start date and save date alone are not necessarily an accurate representation of the amount of time it takes to sort the assets. Instead, we track the user and start time when the user starts the Sort action. When they either click the Pause or Close button, we would track the end time. We also store a "temporary" end time for the user of whatever they last did in case they never click either of those buttons. This information is stored on the web server both for the Sort* tables and pushed into the record when a record is saved. It is cleared out if a container is restarted.
A new Start Time is recorded when Sort Container action is restarted after pausing. When the user scans an asset, the End Time is added in the ScanTimes DB table. That “End Time” gets updated every time the user scans an asset. This entry is updated even when an invalid asset is scanned.
NOTE
This modified Start Time is not logged for 'Sort Container-Maintenance' and 'Sort Container-Interbranch Transfer' actions
Fill
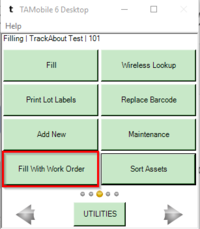
Because the fill flow for Work Orders is quite a bit different than a typical fill process, and because there's still a need to fill without work orders, we have created a separate workflow that is meant for filling specifically with Work Orders. This separate action has the same functionality as the regular Container Fill action with the extra screens to support Work Orders. Steps for Filling with Work Order Users who will be conducting the Fill with Work Order must be added as authorized Fillers for the Racks to be used. Users can be added via the List Racks w Edit Racks page on the website.
When the user starts a Fill with Work Order action, they'll select rack and Asset/Product Family. The default pressure for the Rack will be displayed. Click Continue.
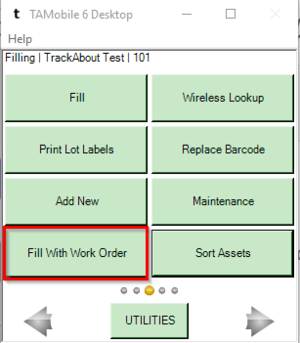
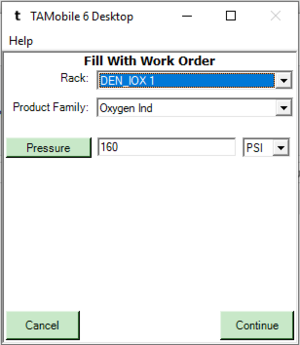
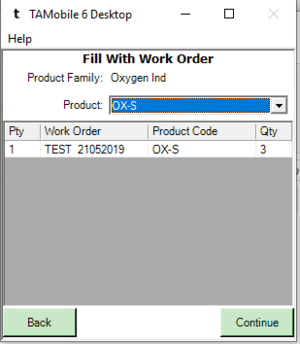
After a product is selected, work orders will be displayed to the user with an associated prioritization number, product code, and quantity. A user can select multiple work orders at one time, as each work order represents only one product code , aka one cylinder size.
The list can be filtered by product code, and the following Work Order information will be displayed:
-
Priority
-
Work Order
-
Product Code
-
Quantity
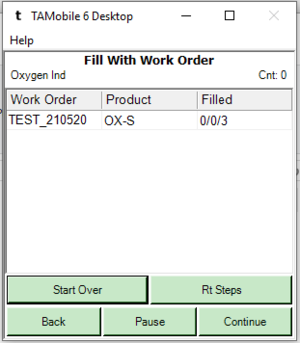
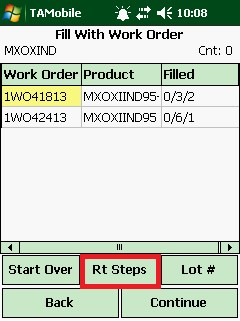
Next, the user will click Continue through the Prioritization screen and is navigated to another 'Fill With Work Order' screen which lists various work order details
-
Work order Number
-
Product
-
Filled
The ‘Filled’ column displays quantity as Filled/Total Filled/Ordered. For example, Quantity; “1/2/3” which indicates 1 Asset has been Filled, 2 Assets in total have been filled against this Work Order (Saved among multiple records) and 3 Assets have been ordered in association with this Work Order.
After selecting the Work Orders, the user with continue to the Scan Screen. As cylinders as scanned, the Fill List will show changes in the Work Order Quantity.
Alert in TrackAbout Mobile 6 - When a user selects a work order that has been fulfilled or deleted, an alert will trigger and display to the user. An alert will prompt the operator to select another work order.
Routing Steps
On the main fill screen that displays assets users will see a button that displays the routing steps for the work orders on the fill. This button will only be active if the user selected a Work Order to fulfill on the Prioritization screen.
The Routing Steps screen has a drop down of all work orders on the fill and allows the user to change work order routing steps being displayed.
Fill List
When user taps anywhere in the grid, we change the data shown to the detail view. It will show all assets, even though it may be a long list. Taping again goes back to 'summary' view. The display groups information by Work Order. Summary View:
-
Work Order
-
Product
-
Filled
The Filled column will show three number: The number filled on this record, the total number filled on the work order, and the total number requested for the work order.
Detailed View: If the user clicks on the grid, we switch to a detailed list:
-
Work Order
-
Pallet
-
Serial Number
A user will scan pallets and/or cylinders to update the work order lines on the screen (mimicking the way that the Delivery with Integrated Order Sync process works today).
NOTE
At the point of cylinder/pallet scanning, the cylinders are moved to the next cylinder status in the flow, i.e. ready for analysis, full.
If a user adds a cylinder that has a product code not represented on the work orders they have selected (aka a different size), the user is shown a screen that will allow them to pick from a list of work orders with that unrepresented product code, and it will get added to the current FILL. If there is no work order with the unrepresented product code available, the word “None” will be displayed in the Work Order column on the scan screen and a warning will be displayed.
Cylinders in the None category will not pass through the interface to the external system for work order completions. A report will be generated from TrackAbout to list all cylinders on None so manual entries can be made in the external system to relieve empty inventory and increase full cylinder inventory. These cylinders will be manually cleared in TrackAbout indicating that all transactions have been completed.
If a user selects SAVE & CLOSE, they will fill out any dynamic forms, and then the record will be saved.
At the Save and Close Action of FILL, TrackAbout will send all scan information for the SORT processes and FILL processes, including start and end times, and scanned time for each transaction for cylinders and pallets. Any calculations to load Hours and Quantities are not done in TrackAbout.
When a Fill with Work Order record is saved, TrackAbout assigns the work order to the asset. This way, the user can see what Work Order this asset was filled and understand why a particular asset was filled. The Work Order number is stored as Custom Asset Info on the asset and this number is cleared out when the cylinder is returned empty.
Fill Feature: Auto-Select
When using the Fill with Work Order action on TA6, TrackAbout can now auto-select the Product Family, Rack, Fill to Pressure, and Work Order that was used during the last Fill action, making it more efficient for the operator.
This is especially helpful when operators are filling only a few assets at a time (e.g. Carbon Dioxide), due to process and safety constraints.
Closing Work Orders
Once a work order is fulfilled (all lines per work order), they fall off the mobile device.
If a work order isn't going to be fulfilled, it will need to be deleted or updated to reflect the quantity that will actually be used.
Editing Records via the Website
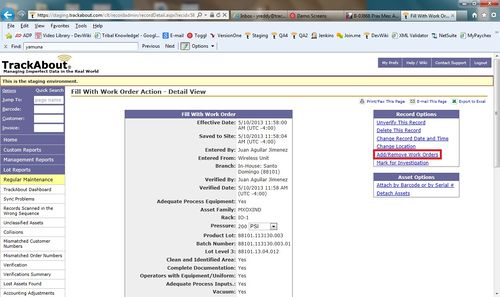
On the record detail / summary pages, users add/remove the work orders associated with the record. Each work order can be removed and more can be added. When adding a work order, they may not select a work order with a product code that is already on the record.
