Delivery (with Integrated Order Sync)
Delivery with Integrated Order Sync lets you record customer deliveries without the need for paper delivery tickets.
TIP
Requires the Deliver with Integrated Order Sync module (formerly called Proof of Delivery).
NOTE
These instructions are for the base version of TrackAbout Mobile 7. Because TrackAbout Mobile 7 is highly customizable, the screens and prompts you see may differ from those shown here.
To use Deliver (with Integrated Order Sync):
-
Start Delivery / Return
-
Select Order
-
Deliver Items
-
Request an additional Electronic Guide Number (if enabled and required)
-
Review the Delivery
-
Get sign-off / send receipt
If you’re using Electronic Guide Numbers, by default you can’t use Delivery with Integrated Order Sync to ship assets that aren’t covered by an EGN. (Contact TrackAbout Support to change the default behavior.)
Returns don’t need to be covered by an EGN unless the customer returned any customer-owned assets or more company-owned assets were returned than shipped.
Tap Delivery/Return (aka Delivery) to start.
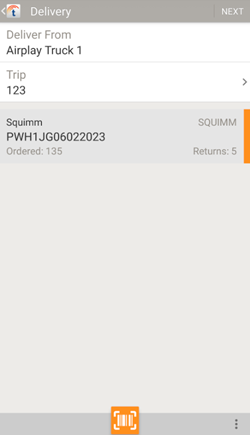
The orders in the selected trip are displayed here.
Tap to select the order you are currently delivering.
Deliver From — The order's delivery location. To change your Deliver From location, see the Menu.
Trip — The trip number. Tap to select from all available trips on the truck.
If you’re using Electronic Guide Numbers, trip numbers are required when manually entering an order.
 — Scan an order number (using your device's camera).
If your system has been configured to read lot numbers on an asset’s tracking barcode label, TrackAbout uses the lot number from the label to automatically fill in the asset’s lot number. For manually entered orders, you’re prompted to select a lot number from another line item in the order, or confirm the lot number is not listed.
 — Tap to display additional options.
Manually Enter Order — Create a new order for immediate delivery.
Proximity Sorting — Tap to sort deliveries by how far away they are (as the crow flies) from the device. The current distance to the delivery location and the direction (cardinal) is displayed under the location’s address.
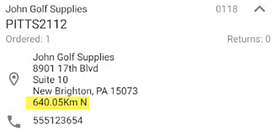
This option is only available if enabled in TrackAbout, TrackAbout Mobile has permission to use your device’s GPS, and your delivery locations include geolocation information.
Show Cancelled Orders — Tap to show only cancelled orders in the list. Tap a cancelled order to see the order’s details. Cancelled orders can’t be un-cancelled using TrackAbout Mobile 7.
Show Undelivered Orders — Tap to only show undelivered orders.
Tap NEXT to continue.
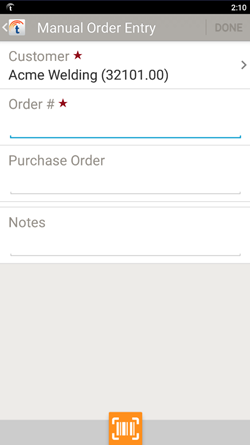
Manually create a new order for immediate delivery.
Customer — The customer placing the order. Tap to select.
Order # — The order number. Tap to enter.
Purchase Order — The purchase order, if any. Tap to enter.
Notes — Order notes. Tap to enter.
— Scan a customer or order # tag using your device's camera.
If your system has been configured to read lot numbers on an asset’s tracking barcode label, TrackAbout uses the lot number from the label to automatically fill in the asset’s lot number. For manually entered orders, you’re prompted to select a lot number from another line item in the order, or confirm the lot number is not listed.
Tap DONE to continue.
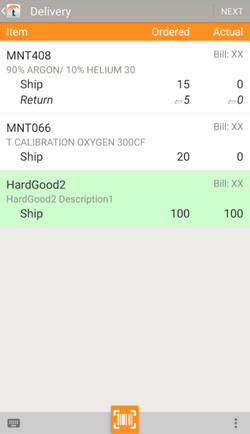
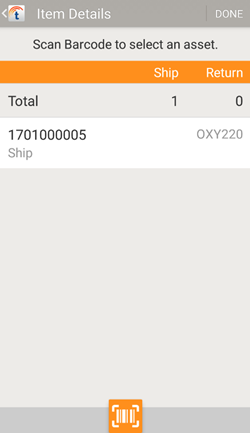
Displays the items in the order by product code, how many were Ordered, and how many have shipped and are being delivered (Actual). It also shows returns, if any.
NOTE
If this is a Branch Transfer, you cannot do returns.
Item — The items in the order, by Product Code. Tap an item to manually change quantities: Scanned, Not-Scanned, or Hardgood.
TIP
If the item is part of a fully tracked asset family, you can only add to it by scanning or manually keying in a tracking number.Ordered — The number of the item ordered.
Actual — The number of the item shipped or delivered.
 — Manually key in a tracking tag to add it to Actual.
— Scan individual assets or pallets (containers) to mark them as shipped or returned, using your device's camera.
TIP
Adding Assets in Pallets / Containers — Scanning a pallet (aka container) adds the pallet and all the assets in it to the pick. Assets in the pallet that don't match ordered items are added as new line items.
— Tap to display additional options.
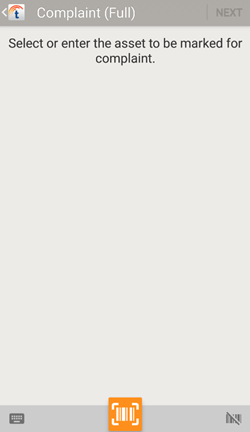
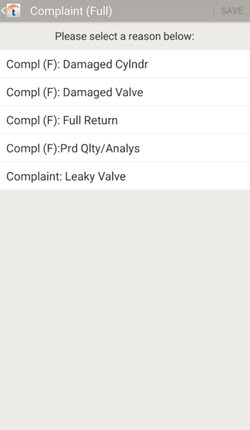
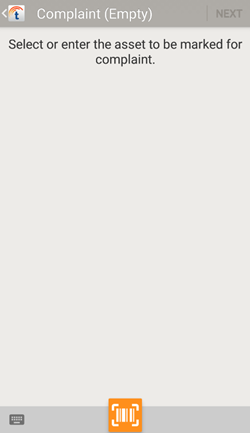
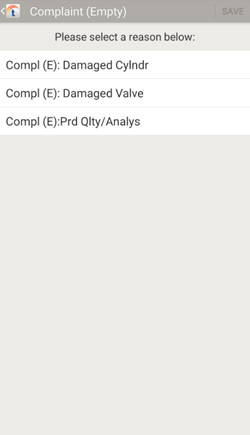
Complaint (full)— Register a complaint about a full asset.
Complaint (empty) — Register a complaint about an empty asset.
Delivery photo — Attach pictures to the delivery record.
Register new asset (ship) — Add a new tracked asset to TrackAbout and add it to the delivery as a ship.
If you’re using Electronic Guide Numbers, you can’t use Delivery with Integrated Order Sync to register new assets during a delivery.
Register new asset (return) — Register a new asset as a return.
If you’re using Electronic Guide Numbers, you can’t use Delivery with Integrated Order Sync to register new assets during a delivery.
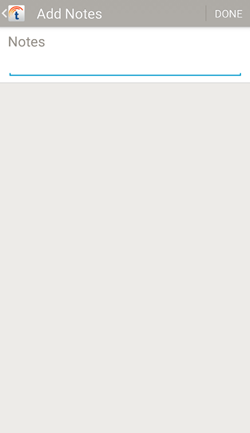
Add notes — Add notes to the delivery.
View details — View details about the assets added to the delivery.
View reserved assets — View assets specifically reserved for the order.
Add line item — Add a line item to the delivery.
If you’re using Electronic Guide Numbers, you can’t manually add a not-scanned asset to the delivery.
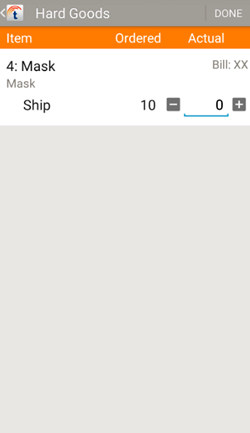
Deliver all hard goods — Tap to automatically add all hard goods in the order that do not require a lot number as ships (Actual).
Finish Transferring Assets — If you are transferring assets from related customers, tap this option to turn off automatically treating subsequent assets from related customers as transfers.
Common Carrier — Collect common carrier information.
Tap NEXT to continue.
NOTE
If any line item's Actual quantity does not equal its Ordered quantity, you may be prompted to enter reasons for the discrepancy before reaching this step.
Transferring Between Related Customers
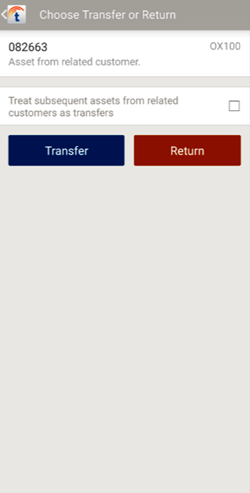
You'll see this screen if the asset you're adding is on the balance of a customer related to the customer you're delivering to.
Treat subsequent assets from related customers as transfers — Tap to automatically treat all other related customer assets in the order as transfers starting with this one. Once checked, you can disable this setting by selecting Finish Transferring Assets in the Optional Action Menu on the delivery summary screen.
Transfer Treat the asset as a transfer.
Return Treat the asset as a return.
Selecting an option returns you to the delivery summary screen.
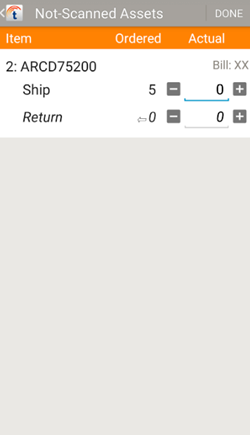
Manually note the number of not-scanned assets shipped or returned.
 — Add one to the quantity.
 — Subtract one from the quantity (minimum 0)
DONE — Save and return to Asset Review.
Actual — Tap to add and tap to subtract as needed.
NEXT — Tap to finish editing the quantity.
TIP
If lot numbers are required, you will be prompted to enter a lot number and before continuing.
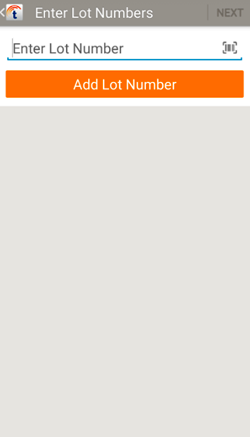
Enter a lot number and tap ADD LOT NUMBER. You may add one or more lot numbers.
Tap NEXT to be prompted to specify how many assets are in each entered lot.
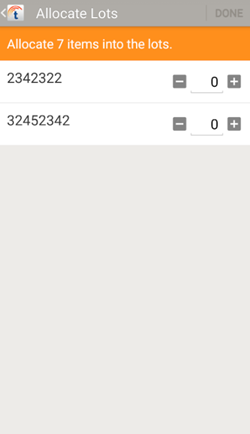
Adjust the quantities as necessary and tap DONE when finished.
 to
to
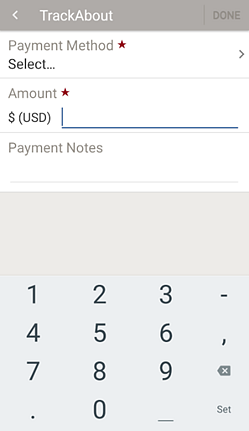
Payment Method — Tap to select the payment method, either cash or check. If you select check, enter the Check Number.
Amount — Tap to enter the amount collected.
Payment Notes — Tap to enter notes about the payment.
DONE — Tap when done to continue.
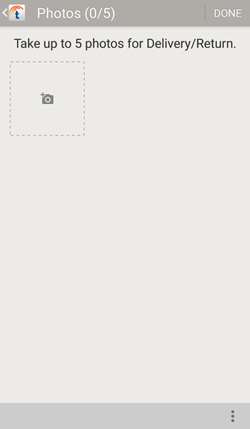
Attach pictures to the delivery record, along with a date, timestamp, and GPS coordinates. Photos can be used as visual proof a delivery was made, or why it couldn’t be.
Tap  to add a new photo using your device's camera.
— Tap to display additional options.
Pick Existing Photo Choose an image from your device.
Tap DONE to continue.
 — Remove the selected item from the delivery record.
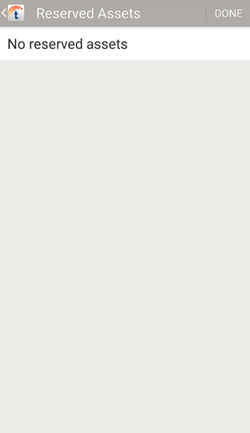
Displays any assets reserved for this order.
NOTE
This option is only available when using the Reservation functionality.
Tap DONE to continue.
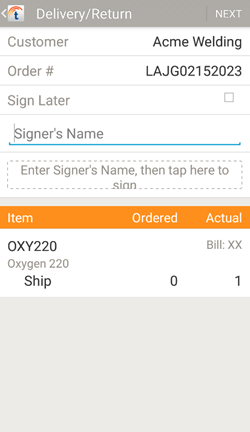
Review the delivery and get a customer signature.
Customer — The customer name.
Order # — The order number.
Sign Later — Check to collect a signature later using Collect Multiple Signatures.
Signer's Name — Enter the name of the person signing for the selected deliveries. Tap Tap here to sign to open Sign-Off.
Item List
Item — The items in the order, by Product Code.
Ordered — The quantity of the item ordered.
Actual — The number of the item shipped/delivered.
Tap NEXT to continue.

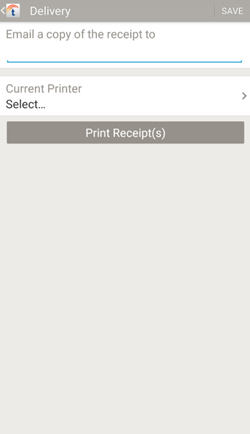
Email a copy of the receipt to — Enter one or more email addresses, separated by commas, to email the delivery receipt to when you tap SAVE.
Print Receipt(s) — Tap to print a copy of the receipt to the selected Current Printer.
NOTE
This option is only available with a printer connected and setup.
Tap SAVE to finish.
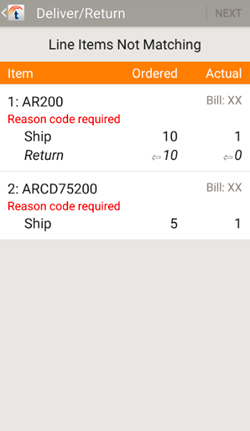
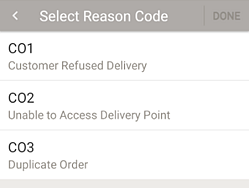
When a line item's Ordered and Actual numbers don't match, you may be prompted to select a reason for each mismatch. If that happens, tap an item to be prompted to select the reason for the mismatch.
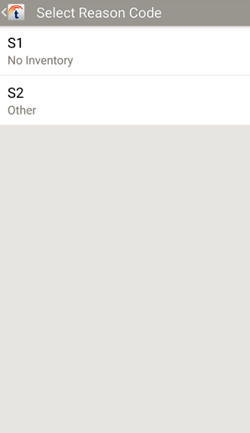
Once all mismatches have been explained, tap NEXT to continue.
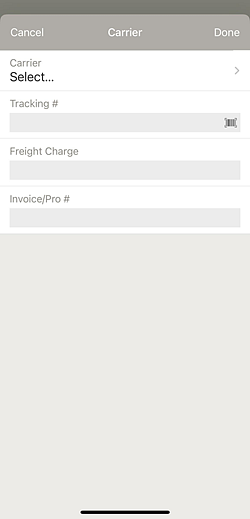
Carrier — Tap to select a carrier from the carrier list.
Tracking # — Tap to enter or scan a tracking number.
Freight Charge — Tap to enter the freight charge.
Invoice/Pro # — Tap to enter an invoice number.
Tap DONE to continue.
Request an Additional Electronic Guide Number
This option is part of TrackAbout’s Electronic Guide feature, which supports compliance with Peru’s Electronic Transfer Guide (Guía de Remisión Electrónica) transportation regulations.
Electronic Guide is available as an option and requires integration with your business system. Contact TrackAbout Support if you are interested in enabling this feature.
An additional Electronic Guide Number is required when a customer returns any customer-owned assets or returns more company-owned assets than were shipped. When this happens, you are automatically prompted to request a new EGN from your business system.
Until a new Electronic Guide Number is received, the delivery can’t be completed.
Tap Request Guide Number to request a new guide number.
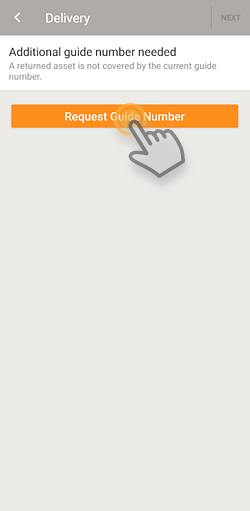
This sends a request to your business system for a new EGN to cover the unexpected items.
-
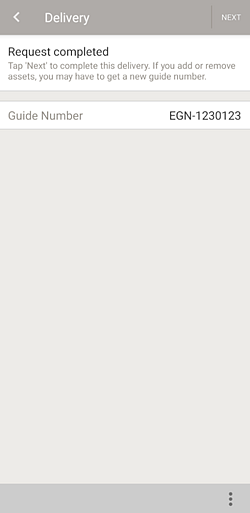
If a new EGN is available, TrackAbout automatically adds it to the delivery and lets you know the delivery can be completed (tap NEXT to continue).
-
If your business system can’t get a new EGN, you’ll be prompted to use a contingency number instead.
-
Tap
, then tap Enter / Edit contingency number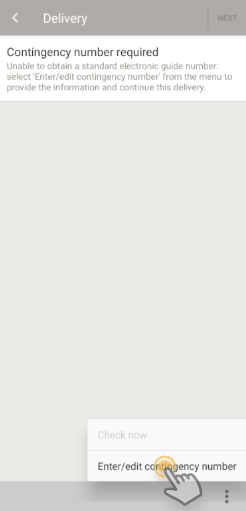
-
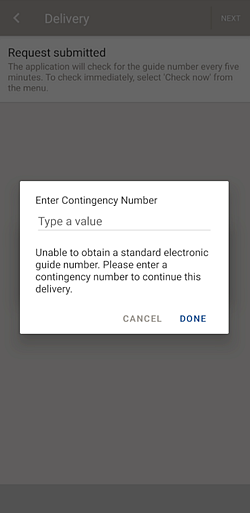
Tap Type a value and enter a Contingency Number, then tap DONE.
-
The delivery can now be completed. Tap NEXT to continue.
-
-
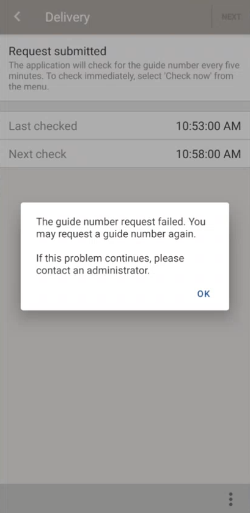
TrackAbout automatically keeps asking your business system for the new number every 30 seconds. While it (and you) are waiting, you’ll see the status of the request on the Request Submitted screen.
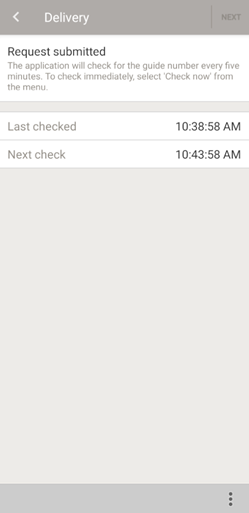
This screen shows you the last time TrackAbout checked with your business system for the number (Last Checked), and the next time it will check (Next Check).
To check on the request now (before the next scheduled check), tap the menu (
) and then tap Check now.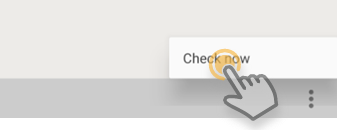
-
If an EGN number is unavailable because TrackAbout encountered an unexpected problem while making the request and cannot continue you’ll get a notice that the request failed, and that you make a new request. If the problem persists, contact an administrator.
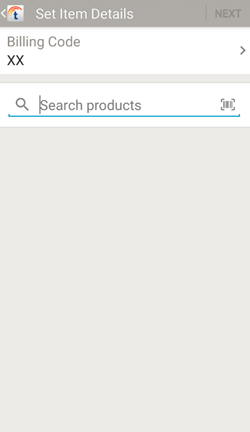
Register a New Asset as a Ship — Product Code
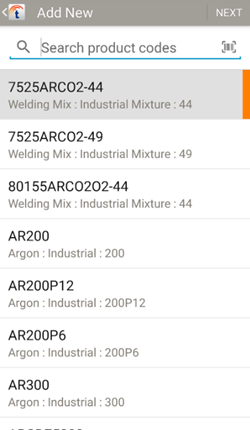
Add a new tracked asset to TrackAbout and add it to the delivery as a ship.
Select a Product Code for the new asset you are adding.
 — Tap to search for a product code. Search results are displayed automatically once you enter at least two characters.
 — Tap to scan a product code barcode.
Tap a product code to select it.
Tap NEXT to continue.
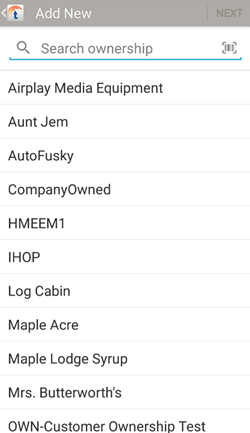
Register a New Asset as a Ship — Ownership
Register a New Asset as a Ship — Barcode and Serial Number
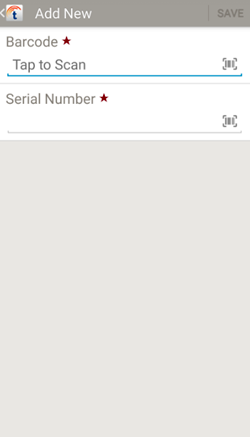
Record the new asset's tracking code (Barcode) and Serial Number.
— Scan a tag containing a tracking code or serial number.
Tap SAVE when done.
Register a New Asset as a Return — Product Code
Add a new tracked asset to TrackAbout and add it to the delivery as a return.
Select a product code for the new asset you are adding.
— Tap to search for a product code. Search results are displayed automatically once you enter at least two characters.
— Tap to scan a product code barcode.
Tap a product code to select it.
Tap NEXT to continue.
Register a New Asset as a Return — Ownership
Register a New Asset as a Return — Barcode and Serial Number
